Load Excel File with Multiple Sheets Dynamically by using Lookup Activity in Azure Data Factory

Issue: How To Load Excel File with Multiple Sheets Dynamically by using Lookup Activity in Azure Data Factory.

In this article, we are going to learn how to load Excel file with multiple sheets dynamically by using lookup activity in the Azure data factory. in this scenario I have an Excel file containing three (03) sheets, now I have to load the two sheets from the file to the Azure Data Factory, and the third one will be ignored, let's start our demonstration.

Open the Azure data factory studio, go to the Author tab, click on pipelines, then click on New pipeline.


Find and drag the Lookup Activity, then go to the source tab, click on the + New button to create a new source dataset.


Select Azure SQL database, then click on continue.


Name your dataset and then create a linked service, name your linked service, select the Azure subscription, select the server name, select the database, select the authentication type, provide the user name and password, then click on create, and then click on ok


In the settings tab, click on the query and write the query as we need sheet names, and then copy 2 sheets from the source.


Find and drag the ForEach loop activity, connect with the lookup activity, go to the settings tab then add the dynamic content from our lookup activity, and add ''.value''.


Click on the pencil sign and go inside the ForEach loop activity, find and drag the copy data activity, go to the source tab and click on the + New button to create a new source dataset.


Select Azure blob storage, then click on continue.


Select Excel, then click on continue.


Name your dataset, select the linked service, provide the file path and file name, worksheet mode will be Name, Select First row as header, select None for import schema, then click on Ok. 


In the source, tab click on the Open button, then go to the parameters tab and create a new parameter, then go to the connection tab and use the parameter.


In the source, tab add the dynamic content for sheets names.


Go to the sink tab, and click on the + New button to create a new sink dataset.


Select Azure SQL database, then click on continue.


Name your Sink dataset, select the linked service, select None for import Schema, then click on Ok.


In the Sink tab, click on Open, then go to the parameters tab, click on the + New button then create a parameter and use it in the connections tab.


In the Sink, tab add the dynamic content, mapping with the ForEach loop Activity, and then click on Debug.


Video Demo: Load Excel File with Multiple Sheets Dynamically by using Lookup Activity in Azure Data Factory


How to Load Data from Multiple XL Sheets to Azure SQL Tables in Azure Data Factory

Issue: How to Load Data from Multiple XL Sheets to Azure SQL Tables in Azure Data Factory.


In this article, we are going to learn how to load data from multiple, EXCEL sheets to Azure SQL Tables in the Azure Data Factory, let's start the demonstration.

How to Create a pipeline:


Open the Azure Data Factory Studio, Go to the author tab, click on pipelines, then click on New pipeline.


Click on the white working window, then go to the parameters tab, click on the + New button,  provide the name, type, and default value. 


Find and drag the ForEach loop activity, go to the settings tab, click on items and add the parameter we created earlier.


Next, go inside the ForEach loop Activity, find and drag the copy data activity, go to the source tab, click on the + New button to create a new source dataset.


Select Azure blob storage then click on continue.


Select format as Excel then click on continue.


Name your dataset, select the linked service, select the file path, select the file, Worksheet mode will be Name, select none for import schema,  then click on ok.


In the source tab click on the Open button, go inside and create a parameter.


In the parameters tab, click on the + New button, then, name the parameter, select the type, give the default values, then go to the connection tab.


In the connection tab, use the parameter which we just created.


Back to the source tab, provide the values from our ForEach loop Activity.


Once we are done with our source tab, go to the sink tab, click on the + New button to create a new Sink dataset.

Select Azure SQL database, then click on continue.


Name your dataset, select the linked service, select none for import schema, then click on ok.


In the sink tab, click on the Open, go to the Parameters tab, click on the + New button and create a parameter.


Go to the connection tab and use the parameter that we just created.


Now map this parameter with our ForEach loop, then click on Debug.


Video Demo: How to Load Data from Multiple XL Sheets to Azure SQL Tables in Azure Data Factory


How to Deploy SSIS Project in Azure File Share and call SSIS Packages in Azure Data Factory Pipeline

Issue: How to Deploy SSIS Project in Azure File Share and call SSIS Packages in Azure Data Factory Pipeline.


In this article, we are going to learn how to deploy SSIS projects in Azure file share and call SSIS packages in Azure Data Factory, in this article, we will also learn, how to create an SSIS package to load two databases, how to create SSIS integration runtime to use Azure file share to save SSIS project, How to create a pipeline, to use SSIS package saved in Azure file share, and at the end, we will learn how to schedule SSIS package by using Azure pipeline.

How to Create an SSIS Package:

Open the Visual studio, in the file tab click on the new project, select the Integration Services project then name your project and click on ok 


Next, bring the data flow task, then inside the dataflow task bring the OLEDB source and OLEDB destination and then configure both, and connect with the SQL server database.


Click on OLEDB source, in the connection manager click new, then provide the SQL Server name, select the authentication type, provide the username and password, provide the database name from where you will read the data, test the connection and then click on ok if everything goes right. 


Once our OLEDB source is ready connect it with the OLEDB destination and click on OLEDB destination in the connection manager click on new, Provide the server name, select the authentication, provide the user name and password, select or enter a database name, test the connection and then click on ok  


Go to the parameter tab, create a new parameter, name your parameter, select the data type, provide the values, select the case sensitive you require then go back to the data flow activity and use the parameter in Source and in the destination.


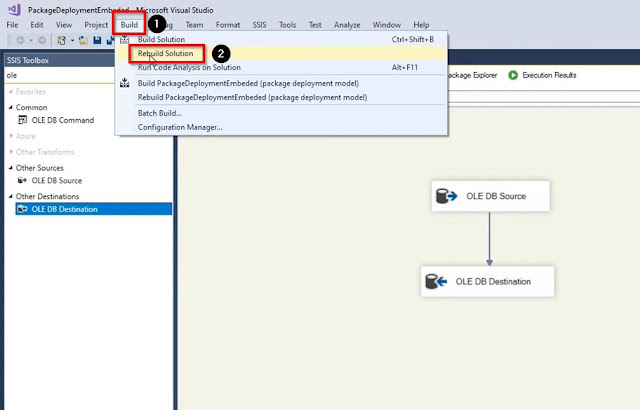
Once we configured our SSIS package click on Build, then click on Rebuild solution. 


Once we are done with our SSIS package, go to the Azure portal and create a storage account, then inside the storage account, we need to create two file share accounts, click on the file share under the Data storage tab, then click on the + File share button to create a new file share.


Name your file share and then click on create and then upload the package file and configuration file from the destination where we have saved these files.

How to Create SSIS Integration Runtime:

Open the Azure data factory, go to the Manage tab, click on integration runtimes, click on the + New button to create an Integration runtime.


Select Azure SSIS then click on continue.


Name your Integration Runtime, select your location, select node size, and number as per your requirement and budget, then click on continue.


Select the deployment settings and then click on the + New button.


Name your package store and click on + new to create a linked service that will be pointing to our package store.


Name your linked service, select the type, select your Azure subscription, Select the Storage account name, select the file share, and click on create. 


Once our linked service is created click on Add.


Our SSIS package which is on file share is added, click on continue and then click on create.


How to Create A Pipeline to use SSIS package saved in Azure file share:

Go to the Author tab, click on pipelines then click on the new pipeline, find and drag the Execute SSIS package activity, then go to the Settings tab select Azure SSIS IR, provide the package location, provide the package path, provide the configuration path, select the domain, then provide the user name and password, and finally click on Debug to execute the SSIS package.


Go to the SSIS parameters tab, click on the + New button, select the scope, provide the name of the parameter which we created in our SSIS package, then provide the same values, and now our pipeline is ready to be executed, click on Debug to execute the SSIS package pipeline.


How to Schedule an SSIS package by using Azure Pipeline:


Click on Add Trigger button, select New/edit.


Name your trigger, select the type, select the start date and time, select your time zone, select the recurrence, select End date and time, select start trigger on the creation and then click on ok.


Video Demo: How to Deploy SSIS Project in Azure File Share and call SSIS Packages in Azure Data Factory Pipeline