TechBrothersIT is a blog and YouTube channel sharing real-world tutorials, interview questions, and examples on SQL Server (T-SQL, DBA), SSIS, SSRS, Azure Data Factory, GCP Cloud SQL, PySpark, ChatGPT, Microsoft Dynamics AX, Lifecycle Services, Windows Server, TFS, and KQL. Ideal for data engineers, DBAs, and developers seeking hands-on, step-by-step learning across Microsoft and cloud platforms.
Issue: How to Create Azure SSIS IR in ADF with Managed SQL Instance - SSISDB In Managed SQL Instance.
In this article, we are going to learn how to create Azure SSIS Integration Runtime in Azure Data factory with managed SQL Instance SQL Server Integration Service Database Managed SQL Instance, let's start our demonstration.
First of all, Create a Data factory and then open your Azure Data factory studio, and then go to the manage tab, here we have to create our Integration Runtime, click on Integration runtimes, and then click on the + New button.
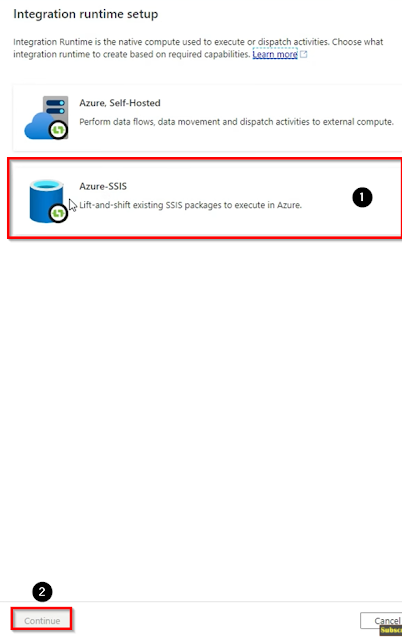
Then click on Azure SSIS then click on continue.
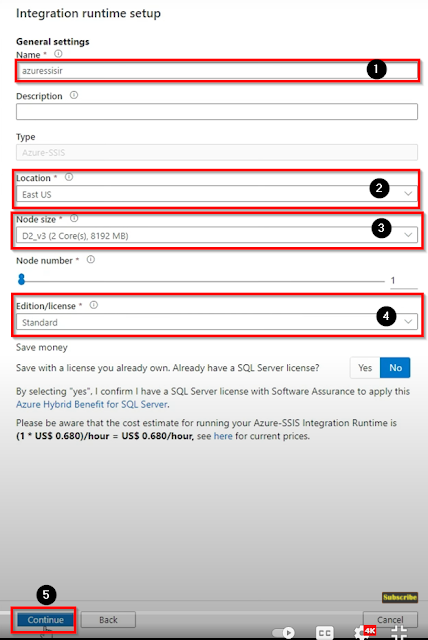
Name your Integration runtime, then select your location, then choose the node size as per your requirement then select the Edition/License and then click on continue.
Select your subscription, then select Catalog database server endpoint, then provide your username and password and then click on continue.
Click on VNet validation and then click on continue.
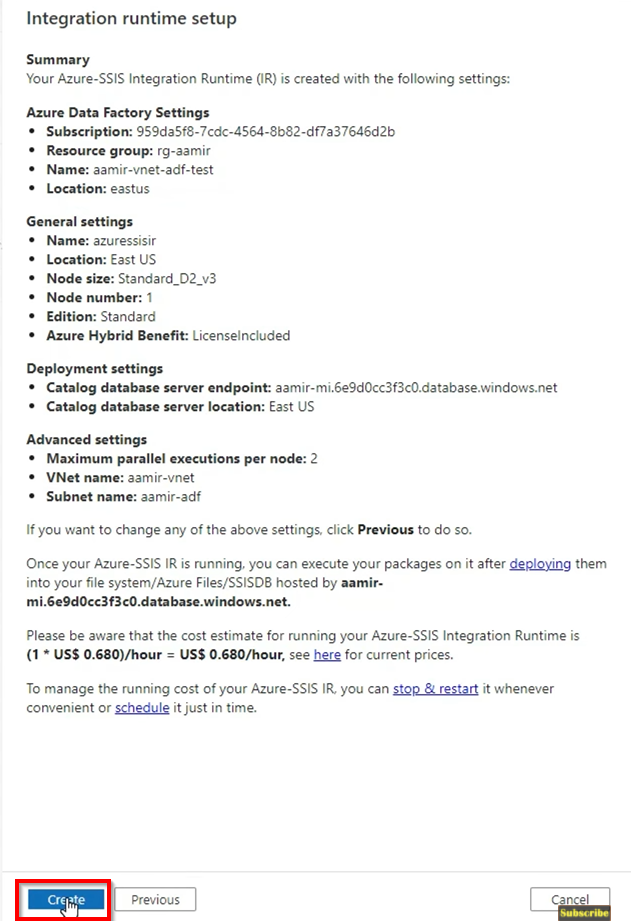
Read the summary of your integration runtime and then click on create.
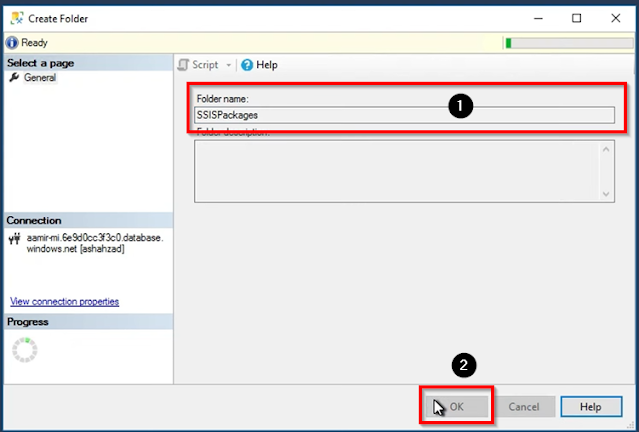
Now open your Remote machine, then open SQL Server Management Studio, then expand Integration services catalog then right-click on SSISDB and then click on Create Folder.
Then name the folder and click on ok.
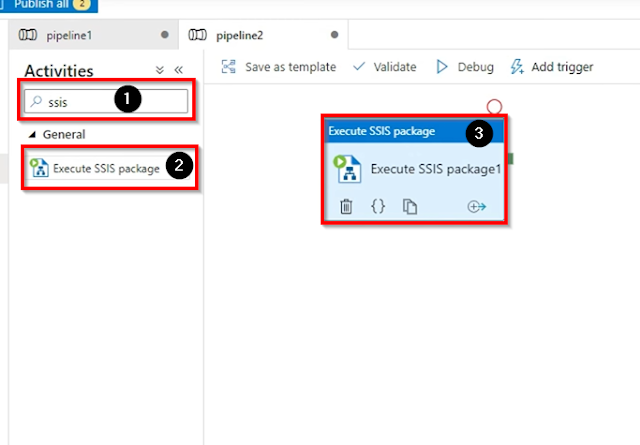
Next, go to the Azure data factory studio, and click on the author tab then go to the pipelines click on + button then click on the New piepline.
Find and drag the Execute SSIS package to the working window.
Go to the settings then provide Azure SQL Server Integration Service IR name, then Select the package location, then select your folder, then click on refresh, and it will bring the projects inside your folder, select the project, then select package and execute the package.
Video Demo: How to Create Azure SSIS IR in ADF with Managed SQL Instance - SSISDB In Managed SQL Instance
Issue: How to Load Multiple CSV Files to Azure SQL Table and Move them to the Archive Folder and Delete from source folder in Azure Data Factory.
In this article, we are going to learn how to load multiple CSV files to the Azure SQL table, and how to move them into another folder and then delete the files from the source. let's start our demonstration, First of all, we will go to the storage account and create some containers, and load the files.
Open your Azure Data Factory then go to the Storage and then click on containers and then click on + Container to create a new container, then name the container and click on create, once our container is created do the same for the next container, I have created two folders, one is Source and another one is Archive, you can create tons of containers as per your requirement.
Once our folders are created, open the source folder and click on the upload button on the top of the window, then navigate to the files which you want to upload, select the files and click on upload.
Once our files are uploaded now our next step is to open our Azure data Factory Studio and create a linked service that we need to use in the pipeline.
How to Create a Linked Service in Azure Data Factory.
Open the Azure Data Factory Studio, then go to the Manage tab, then click on linked services, and then click on the + New button to create a new linked service.
Then select Azure blob storage, as we read the data from our blob storage, and then click on Continue.
Name the linked service, then select Azure subscription, then select Storage account name and then click on create.
Once our linked service is created we need another linked service as a connection to our Azure SQL database, so we can write data to the Azure SQL table, click on the + New button then select Azure SQL Database and then click on continue.
Name the linked service, then select Azure subscription, then select server name, then provide a database name, then select authentication type, then provide username and password, then test the connection and then click on create.
Now we have created two linked services, one for our Azure blob storage from where we will read the data and one for our Azure SQL database where we will write the data, the next step is to create a pipeline.
How to create a pipeline in Azure Data Factory.
Go to the Author tab and then click on the + button then click on New pipeline.
Name the pipeline and then go to the activities tab and find and drag the Copy Data activity to the working window, and then click on the source and then click on + New button to create a new source dataset.
Then select the Azure blob storage and click on continue.
Then select CSV file as file format and then click on continue.
Name the pipeline, then select a linked service which we have created, then select the source files path, select the first row as header, then select none for import schema, then click on ok.
Once our source dataset is created, now we have to create a sink dataset, to create a sink data set go to the sink tab and then click on the + New button.
Then select Azure SQL database, and then click on continue.
Name the dataset, then select the linked service that we have created before, then provide the table name where we will write the data, and then click on ok.
Then go to the source tab and click on the wildcard file path and then input the values (*.txt).
Now bring another copy activity and connect with the older one and then click on the copy activity and go to the source tab then select the dataset which we have created in our previous copy activity, then click on the wildcard file path and then input the values (*.txt).
Then go to the sink tab and here we need a new dataset because we are pointing to a new path to write the data, so click on the + New button.
Select the Azure blob storage and click on continue.
Select CSV as file format and then click on continue.
Name the dataset, then select the linked service which we have used in our previous dataset, then provide the folder path then select first row ad header if your files has header, then click none for import schema and then click on ok
The next step is to bring delete activity and place it at the end of our activities, then connect and go to the source tab, select the source dataset, then click on the wildcard file path and then put the values (Emp*.txt).
as we have created our pipeline and placed the activities and configured accordingly, now click on Debug.
Video Demo: How to Load Multiple CSV Files to a Table in Azure Data Factory
Issue: How to Copy files from one folder to another Folder and Delete in Source Folder in Azure Data Factory.
In this article, we are going to learn how to copy files from one folder to another folder and delete them from the source folder in Azure Data Factory, First of all, we will create a storage account and then will learn how to create a folder and copy files from one folder to another folder and delete from the source folder.
How to Create a Storage Account.
Open Azure data factory portal and then click on the Storage Accounts on the dashboard, then click on + create button to create a new Storage account.
Select Azure subscription, then select Resource group, then provide the storage account name, then select your region, and then click on Review + Create then hit Create.
Once our storage is created, now we have to create containers or folders inside our newly created storage.
How to Create Container / Folder in Azure Data Factory.
Click on the Containers under the Data storage tab and then click on the + Container button to create a new Container.
Name the container and then click on Create button, it will be created and appear in the storage, then again click on the + Container button and create another container, you can create tons of containers as per your requirement.
Once our required containers are created, let's upload the files from our local machine storage.
How to upload files from local storage to the containers in Azure Data Factory.
Open the folder in which you want to upload the files, then click on the upload button on the top and then navigate to the files, then select the files and click on upload you can select multiple files at one time.
Once our files are uploaded now our next step is to create a linked service.
How to Create a Linked Service in Azure Data Factory.
Open the Azure Data Factory studio, then go to the Manage tab and then click on linked services then click on the + New button to create a new linked service.
Select the Azure Blob storage, then click on continue.
Name the linked service, then select Azure subscription, then select a storage account name, and then click on Create.
Once our linked service is created, the next step is to create a pipeline.
How to create a Pipeline in Azure Data Factory.
Go to the author tab and then click on pipelines then click on the + button, and then click on the new pipeline to create a new pipeline.
Name the pipeline and then go to the activities tab and find and drag the copy data activity to the working window, and click on the source tab then click on the + New button to create a new source dataset.
Select the Azure Blob storage and click on continue.
Select the source file format, in my case it is CSV file, then click on continue.
Then give a name to the dataset, then select linked service that we have created before, then select source folder path, then select none for import schema, and then click on ok.
As our source dataset is completed now we have to create a sink dataset, to create a sink dataset, go to the sink tan and then click on the + New button.
Then select Azure Blob storage and click on continue.
Then select the file format CSV and then click on Continue.
Name the dataset, then select the linked service, in this case, we will select the same linked service that we have selected in the source dataset because we are pointing to the same blob storage, then select the path folder where we need to copy the files, then select none for import schemas and then click on ok.
Next, go to the source tab and click on Wildcard file path, as we are going to copy multiple files so we have to give the values, which is (*.txt) which means all the files.
Then go to the activities tab and find and drag the delete activity and connect with the copy activity, as we have to delete files after copying them.
Then click on the source tab where we need to specify which files we want to delete, so click on the wildcard file path then put the values (*.txt) and then go to the pipeline and click on debug.
Once you will click on Debug it will copy all the files from the source path to the sink path and then delete all the files from the source path.
Video Demo: How to Copy files from one folder to another Folder and Delete in Source Folder