TechBrothersIT is a blog and YouTube channel sharing real-world tutorials, interview questions, and examples on SQL Server (T-SQL, DBA), SSIS, SSRS, Azure Data Factory, GCP Cloud SQL, PySpark, ChatGPT, Microsoft Dynamics AX, Lifecycle Services, Windows Server, TFS, and KQL. Ideal for data engineers, DBAs, and developers seeking hands-on, step-by-step learning across Microsoft and cloud platforms.
Topic: How to Get a List of Tables, Schema of Table, and Definition of Tables in Kusto.
How to get a List of tables, Schema of Table, and definition of tables in Kusto Query | Kusto Query Language Tutorial (KQL) Kusto Query Language is a powerful tool to explore your data and discover patterns, identify anomalies and outliers, create statistical modeling, and more. The query uses schema entities that are organized in a hierarchy similar to SQL's: databases, tables, and columns. A Kusto query is a read-only request to process data and return results. The request is stated in plain text, using a data-flow model that is easy to read, author, and automate. Kusto queries are made of one or more query statements.
 // .show table ..................
 // How to get list of all tables in database in Kusto -----> .show tables
 .show tables
 //how to get specific tables
 .show tables (CustomerAsia,ACustomer)
 //How to show detail of table/s:.show table details
 .show table CustomerA details
 // how details for multiple tables
 .show tables (CustomerA,Salary) details
 // show details for all tables
 .show tables details
 // How to get Table Schema in Kusto
 // Synatax : .show table TableName cslschema

 .show table ACustomer cslschema
 // get the schema in json format
 .show table ACustomer schema as json
Video Demo: How to get List of Tables, Schema of Table and Definition of Tables in Kusto Query Language
Topic: How to Create Single or Multiple Tables in a Single Statement by Using KUSTO Query.
How to create single or multiple tables in a single file statement by using Kusto Query | Kusto Query Language Tutorial (KQL) Kusto Query Language is a powerful tool to explore your data and discover patterns, identify anomalies and outliers, create statistical modeling, and more. The query uses schema entities that are organized in a hierarchy similar to SQL's: databases, tables, and columns. A Kusto query is a read-only request to process data and return results. The request is stated in plain text, using a data-flow model that is easy to read, author, and automate. Kusto queries are made of one or more query statements.
 //.create-merge table
 // This can be used to create new table. If table does exists then it will add the new columns if specified columns already
 // does not exist in the table. If you will specify a column with the different data type, then the command will fail. this commend does not
 // drop columns if not mentioned in column list.

 .create-merge table Customer(CustomerId:int ,CustomerName:string,
 CustomerAddress:string,
 Age:int)
 with (docstring="this is Customer Table",folder ="CustomerData")

 //Let's check the definition of table
 .show table Customer schema as json

 // add one row data
 .ingest inline into table Customer <|
 100,Aamir,SomeAddress,43

 // check data
 Customer

 // let's rerun and add one more column, phonenumber:string, add add new docstring and move to new folder
 .create-merge table Customer(
 CustomerId:int ,
 CustomerName:string,
 CustomerAddress:string,
 Age:int,
 phonenumber:string)
 with (docstring="Customer table new definition",folder ="CustomerData1")


 //Let's check the definition of table
 .show table Customer schema as json

 // Show list of tables
 .show tables

 // check the data
 Customer


 //.create-merge tables : Let you create multiple table in single command
  .create-merge tables
  CustomerAsia (Name:string, dob:datetime, UserId:string),
  CustomerEurope (Name:string, dob:datetime, UserId:string,Region:string)

  //check all tables
  .show tables
Video Demo: How to Create Single or Multiple Tables in Single Statement by using Kusto Query Language
Topic: How to Create Empty table by Using Definition of Another Existing Table in Kusto Query KQL Tutorial
How to Create an Empty table by Using Definition of Another Existing Table in Kusto Query KQL (KQL) Kusto Query Language is a powerful tool to explore your data and discover patterns, identify anomalies and outliers, create statistical modeling, and more. The query uses schema entities that are organized in a hierarchy similar to SQL's: databases, tables, and columns. A Kusto query is a read-only request to process data and return results. The request is stated in plain text, using a data-flow model that is easy to read, author, and automate. Kusto queries are made of one or more query statements.
 // if you want to create empty table depending upon definition of another table
 // Syntax : .create table TableName based-on OtherTable [with ([docstring = Documentation] [, folder = FolderName] )]

 // let's say we have a customer Table and we want to create a CustomerNew table with the same definition
 .create table CustomerNew based-on Customer

 .create table TotalSaleAsia based-on TotalSale1

 // if you want to create new table with docdefinition and in new folder
 .create table TotalSaleEurope based-on TotalSale1 with (docstring='This is used for Europe Sale',folder="EuropeSale")

 // show definition of a table
 .show table TotalSaleEurope schema as json

 .show tables
Video Demo: How to Create Empty table by Using Definition of Another Existing Table in Kusto Query KQL Tutorial
Topic: How to Create Table, Drop Table, and Rename Table in Kusto Query Language (KQL).
How to Create, Drop, and Rename Table in Kusto | Kusto Query Language (KQL) Kusto Query Language is a powerful tool to explore your data and discover patterns, identify anomalies and outliers, and create statistical modeling, and more. The query uses schema entities that are organized in a hierarchy similar to SQL's: databases, tables, and columns. A Kusto query is a read-only request to process data and return results. The request is stated in plain text, using a data-flow model that is easy to read, author, and automate. Kusto queries are made of one or more query statements.
 // How to create, Drop. or Rename table in Kusto Query Language
 // Syntax : create table TableName(Column1:DataType,ColumnTwo:DataType,....) with ( [docstring = Documentation] [, folder = FolderName] )

 // Let's create Customer table with CustomerId,CustomerName,CustomerAddress,Age with docstring=" This is Customer Table"
 // in Folder CustomerData

 .create table Customer(CustomerId:int ,CustomerName:string,
 CustomerAddress:string,Age:int)
 with (docstring="this is Customer Table",folder ="CustomerData6")

 .show tables

 //Let's check the definition of table
 .show table Customer schema as json
 //Let's drop the table now
 .drop table Customer
 // if you want to drop multiple tables you can use below
 .drop tables (ACustomer,CustomerAsia,CustomerEurope)

 .drop tables (ACustomer,CustomerAsia,CustomerEurope)

 // Show list of tables
 .show tables
// How to Rename Table in Kusto
// Syntax : .rename table OldName to NewName
// Let's say we want to rename CustomerNew table to Customer
.rename table CustomerNew to Customer<div><br />
Video Demo: How to Create Table, Drop Table, and Rename Table in Kusto | Kusto Query Language (KQL)
Topic: How to move Tables in Folders and Subfolders by Using Kusto | Kusto Query Language Tutorial (KQL)
How to move Tables in Folders and Subfolders by Using Kusto | Kusto Query Language Tutorial (KQL)Kusto Query Language is a powerful tool to explore your data and discover patterns, identify anomalies and outliers, create statistical modeling, and more. The query uses schema entities that are organized in a hierarchy similar to SQL's: databases, tables, and columns. A Kusto query is a read-only request to process data and return results. The request is stated in plain text, using a data-flow model that is easy to read, author, and automate. Kusto queries are made of one or more query statements.
 // Add Table To Main Folder
 .create table Customer(id:int,Name:string)
 .create table Salary(id:int,Salary:int)
 //Let's move them to Sale Folder
 .alter table Customer folder @"Sale"
 .alter table Salary folder @"Sale"
 // Let's create few more Tables
 .create table AsiaCustomer(id:int,Name:string)
 .create table EuropeCustomer(id:int,Name:string)
 .create table NACustomer(id:int,Name:string)
 //Let's move them out of Asia,Europ and North America and leave them in Region
 .alter table AsiaCustomer folder @"Region"
 .alter table EuropeCustomer folder @"Region"
 .alter table NACustomer folder @"Region"
 // How about without any region at all
 .alter table AsiaCustomer folder @""
 .alter table EuropeCustomer folder @""
 .alter table NACustomer folder @""
Video Demo: How to move Tables in Folders and Subfolders by Using Kusto | Kusto Query Language Tutorial (KQL)
Topic: Docstring in Kusto Query Language | Add Descriptive Information for Table, Column or function in Kusto Query Language.
Docstring in Kusto Add descriptive information for Table, Column or Function in Kusto Query Language (KQL)Kusto Query Language is a powerful tool to explore your data and discover patterns, identify anomalies and outliers, create statistical modeling, and more. The query uses schema entities that are organized in a hierarchy similar to SQL's: databases, tables, and columns. A Kusto query is a read-only request to process data and return results. The request is stated in plain text, using a data-flow model that is easy to read, author, and automate. Kusto queries are made of one or more query statements.
 //DocString is free descriptive text that you can attach to a table/function/column. This string is presented in various UX settings next to the entity name.

 //.alter table docstring

 .alter table MyTable docstring 'This is Customer Table'


 //.alter-merge column-docstring
 .alter-merge table MyTable column-docstrings (Name:"This is full name for Customer", Address:"Customer Addresss")
Video Demo: Docstring in Kusto Add descriptive information for Table, Column or Function in Kusto Query Language (KQL)
Topic: How to Add or Remove Columns in Table by Kusto Query | Kusto Query Language Tutorial (KQL)
How to Add or remove columns in the table by Kusto Query language | Kusto Query Language Tutorial (KQL) Kusto Query Language is a powerful tool to explore your data and discover patterns, identify anomalies and outliers, create statistical modeling, and more. The query uses schema entities that are organized in a hierarchy similar to SQL's: databases, tables, and columns. A Kusto query is a read-only request to process data and return results. The request is stated in plain text, using a data-flow model that is easy to read, author, and automate. Kusto queries are made of one or more query statements.
 // How to Add or Drop Columns to existing table by using .alert-merge and .alter table

 //.alter-merge
 //Columns that don't exist and which you specify, are added at the end of the existing schema.
 //If the passed schema doesn't contain some table columns, the columns won't be deleted.
 //If you specify an existing column with a different type, the command will fail.

 .create table MyTable(id:int)
 //ingest some data into the table
 .ingest inline into table MyTable <|
 100
 // Add two more columns
 MyTable
 .alter-merge table MyTable (Name:string, Address:string)

 MyTable
 //insert some data
 .ingest inline into table MyTable <|
 101,aamir,fake address

 // run the statement with existing columns
 .alter-merge table MyTable (Address:string,phonenumber:string)
 //.alter table
 //The table will have exactly the same columns, in the same order, as specified. Specify the table columns:
 //If existing columns aren't specified in the command, they'll be dropped and data in them will be lost, like with the .drop column command.
 //When you alter a table, altering a column type isn't supported. Use the .alter column command instead.
 //.alter table works in little different way
 .create table Customer(Customerid:int)
 .ingest inline into table Customer <|
 100

 // check data
 Customer

 //check the schema of a table in Kusto
 .show table Customer cslschema

 .alter table Customer(customerName:string,address:string)
 .alter table Customer(address:string,customerName:string)

 // check the data
 Customer

 //ingest data
 .ingest inline into table Customer <|
 Aamir,fakeaddress1
 //add new column phone number and make sure existing columns address and CustomerName do not drop
 .alter table Customer(address:string,customerName:string,phonenumber:string)

 //check the data
 Customer

 // ingest some data
 .ingest inline into table Customer <|
 Aamir,fakeaddress1,505-xxxx-0000

 //check the data
 Customer

 //drop column phone number from Customer table, simple exclude the column from .alter table list you want to drop
 .alter table Customer(customerName:string,address:string)

 //Check if column dropped
 Customer
Video Demo: How to Add or Remove Columns in Table by Kusto Query | Kusto Query Language Tutorial (KQL)
Topic: Data Types and How to Create Table by using Kusto Query | Kusto Query Language Tutorial (KQL)
Data Types and How to Create Table by using Kusto Query | Kusto Query Language Tutorial (KQL) Kusto Query Language is a powerful tool to explore your data and discover patterns, identify anomalies and outliers, create statistical modeling, and more. The query uses schema entities that are organized in a hierarchy similar to SQL's: databases, tables, and columns. A Kusto query is a read-only request to process data and return results. The request is stated in plain text, using a data-flow model that is easy to read, author, and automate. Kusto queries are made of one or more query statements.
 // Data Types and How to Create Table by using Kusto

 .create table Person(
 isMale:bool,//     boolean     System.Boolean     int8
 dob:datetime,//     date     System.DateTime     datetime
 hobbies:dynamic,//     System.Object     array or dictionary or any of the other values
 upid:guid,          //System.Guid     guid
 salary:int,          //System.Int32     int
 phonenumber:long,//          System.Int64     long
 height:real,     //double     System.Double     real
 fullname:string,     //     System.String     string
 weigh:decimal     //     System.Data.SqlTypes.SqlDecimal     decimal
 )
 //How to insert the data into table

  .ingest inline into table Person <|
 true,2010-01-01,"{""hobby1"":""Programming"", ""Hobby2"":""Hiking""}",6db865a1-6a09-493d-8027-d27db847fc3f, 4000,5050000999,5.11,Aamir Shahzad,170
 0,2000-01-01,"{""hobby1"":""Programming"", ""Hobby2"":""Hiking""}",99b865a1-6a09-493d-8027-d27db847fc3f, 3000,7050000999,4.10,Lisa Robert,140
 //How to check the inserted data
 Person

 Microsoft link for data types in Kusto
 https://docs.microsoft.com/en-us/azure/data-explorer/kusto/query/scalar-data-types/
Video Demo: Data Types and How to Create Table by using Kusto Query | Kusto Query Language Tutorial (KQL)
Topic: Database Management Commands For Azure Data Explorer by using Kusto Query
Database Management Commands For Azure Data Explorer by using Kusto Query | Kusto Query Language Tutorial (KQL) Kusto Query Language is a powerful tool to explore your data and discover patterns, identify anomalies and outliers, create statistical modeling, and more. The query uses schema entities that are organized in a hierarchy similar to SQL's: databases, tables, and columns. A Kusto query is a read-only request to process data and return results. The request is stated in plain text, using a data-flow model that is easy to read, author, and automate. Kusto queries are made of one or more query statements.
 //Database Control Commands

 .show databases     //Returns a table in which every record corresponds to a database in the cluster that the user has access to
 .show database     //Returns a table showing the properties of the context database
 .show cluster databases     //Returns a table showing all databases attached to the cluster and to which the user invoking the command has access
 .alter database prettyname //     Alters a database's pretty (friendly) name
 .show database schema     //Returns a flat list of the structure of the selected databases with all their tables and columns in a single table or JSON object
 .execute database script     //Executes batch of control commands in scope of a single database
 // create multiple tables in a database by using Kusto
 .execute database script <|
 //create new table
 .create table customer(customerid:int,customerName:string)
 //create another table
 .create table Sale(salid:int,productname:string)
 //Show list of Tables with data types by using Kusto
 .show database schema
 // Drop multiple tables in Azure Data Explorer Database by using Kusto
 .execute database script <|
 //create new table
 .drop table customer
 //create another table
 .drop table Sale
Video Demo: Database Management Commands For Azure Data Explorer by using Kusto Query
Topic: Tools to Connect to Azure Data Explorer and Write Kusto Query -Kusto Query Language Tutorial (KQL)
Tools to Connect to Azure Data Explorer and Write Kusto Query -Kusto Query Language Tutorial (KQL) Azure Data Explorer is a fast, fully managed data analytics service for real-time analysis on large volumes of data streaming from applications, websites, IoT devices, and more. Ask questions and iteratively explore data on the fly to improve products, enhance customer experiences, monitor devices, and boost operations. Quickly identify patterns, anomalies, and trends in your data. Explore new questions and get answers in minutes. Run as many queries as you need.
 Tools to Connect to Azure Data Explore and Write Kusto Queries

 Add MSA account
 https://docs.microsoft.com/bs-cyrl-ba/azure/data-explorer/kusto/management/access-control/principals-and-identity-providers
 .add database databasename users ('msauser=userid@domainName.com')
Issue:How to Install Azure Data Explorer and Start Writing Kusto Query Kusto Query Language Tutorial (KQL)
In this article, we are going to learn how to install Azure Data Explorer and start writing Kusto Query Azure Data Explorer is a fast, fully managed data analytics service for real-time analysis of large volumes of data streaming from applications, websites, IoT devices, and more. Ask questions and iteratively explore data on the fly to improve products, enhance customer experiences, monitor devices, and boost operations. Quickly identify patterns, anomalies, and trends in your data. Explore new questions and get answers in minutes. Run as many queries as you need, let's start our demonstration.
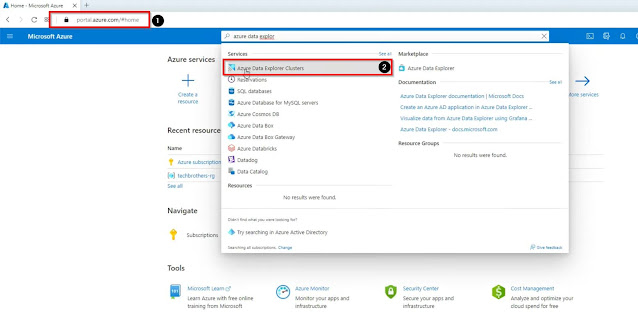
Open your Azure portal, then find and click on the Azure Data explorer cluster.
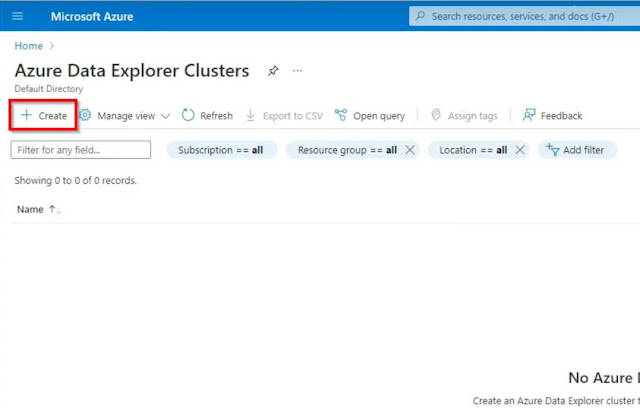
Click on the + Create button to create an Azure data explorer cluster.
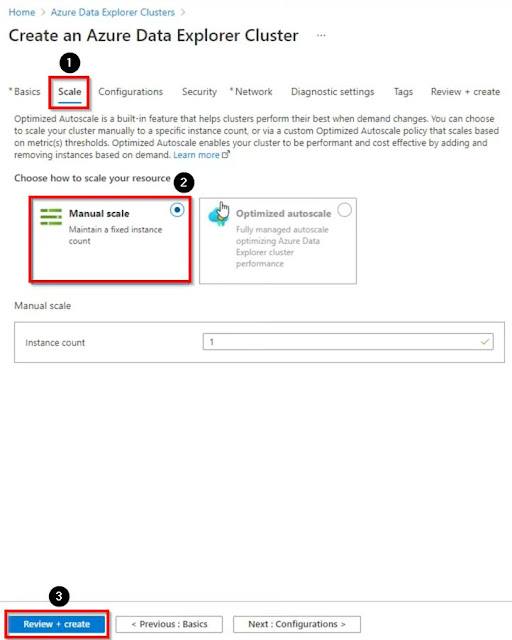
In the basics tab, select your Azure subscription, select your resource group, name your cluster, select your region, select your compute specifications as per your need or requirement, then go to the scale tab.
in the scale tab, choose how to scale your resource, click on Review + create then click on create.
Once our Azure data explorer cluster is ready, go to the resource, then first of all we have to create a database, click on database creation.
name your database, select the retention period, select cache period, then click on create.
Once the database is created, open the database, then click on Query to start writing the Kusto query.
Video Demo: How to Install Azure Data Explorer and Start Writing Kusto Query Kusto Query Language (KQL)
Issue: How to Create Azure SSIS IR with MSDB Package Store.
In this article, we are going to learn how to create Azure SSIS Integration Runtime with the MSDB package store, let's start our demonstration.
How to Create Virtual Network:
Open the Azure portal, then find and click on Virtual Networks, then click on the + Create button to create a new virtual network, then in the basics tab select your Azure subscription then select your resource group, name your virtual network, select your region and then click on Review + create and then create.
Once we are done with our Virtual network, let's create three subnets, the one we will use for our Managed instance, the second one for RDP, and the third one for the Azure data factory, Open your virtual network and inside the virtual network click on the subnets under the settings tab, then click on the + Subnet button to create a new subnet, then name your subnet and click on save.
How to create a Managed instance:
On the Azure portal find and go to the SQL Managed Instance, then click on the + Create button to create a new managed instance, then select your subscription, select your resource group, name your managed instance, then select your region, then provide a unique login name and create a strong password, then click on Next to networking.
Then select the subnet we created earlier for our managed instance, click next to the additional settings, then next to the review + create it will show the summary of your managed instance, and then click on Create.
How to Create a Virtual Machine:
On the Azure portal find and go to the Virtual Machines, then click on the + Create button to create a new virtual machine, then in the basics tab select your Azure subscription, then select your resource group, then name your virtual machine, select your region, then select your required operating system.TBC
Then, create a username and a strong password, then select ''Allow selected ports'', in the inbound ports select '' RDP(3389), then go to the Disks tab.
In the disks tab, select the required OS disk type as per your requirement and then next to the networking tab.
In the networking tab, select the virtual network, then select the subnet which we have created for our virtual machine and then leave the rest as it is and click on Review + create and then create your virtual machine.
Once our Virtual machine is created, go to the resource, then go to the connect under the settings tab, download the RDP file, then provide the user name and password, and then connect with our Virtual machine, then open the server manager and click on the local server and turn off the IE Enhanced security configuration, then download and install the visual studio 2019 from the web then download and install SQL Server Management Studio.
Once our Visual Studio 2019 is installed, open the Visual studio 2019, click on the file, New then click on the project, search for integration, select Integration services project, and click on Next.
Name your project, select the location and then click on create.
Right-click on the project, and convert it to a package deployment model.
Find and bring the data flow task and then save the package.
Once our managed instance is ready, go to the resource and copy the hostname, then go to the Virtual machine open the SQL Server Management Studio and connect it to the Managed Instance, provide the hostname, select the authentication type, provide the user name and password then click on connect.
Once we are connected with our managed instance, let's create databases and tables, in my case, I have created two databases one named source and the other one named destination, then open the Visual studio, create a new SSIS package, then bring the data flow task inside the data flow then bring the OLEDB source and OLEDB destination and then configure both, and connect with the SQL server database.
Click on OLEDB source, in the connection manager click new, then provide the SQL Server name, select the authentication type, provide the username and password, provide the database name from where you will read the data, test the connection and then click on ok, then select the table and click Ok.
Once our OLEDB source is ready connect it with the OLEDB destination and click on OLEDB destination, in the connection manager click on new, Provide the server name, select the authentication type, provide the user name and password, select the database name, test the connection click on ok, then select the table name and then click on ok
Now, go to the Variables tab, click on the new variable button, provide the variable name, select the type, and provide the variable values.
Next, right-click on the source, go to the properties, then click on expressions, it will open a new window, then select password, click on add expressions button, it will open another window then select the variable we created earlier, then click on ok, then follow the same for the destination and then save the SSIS package.
Create a new Azure data factory, then Open the Azure data factory studio, go to the Manage tab, click on integration runtimes, click on the + New button to create an Integration runtime.
Select Azure SSIS then click on continue.
Name your Integration Runtime, select your location, select node size, and number as per your requirement and budget, then click on continue.
Select the deployment settings and then click on the + New button.
Name your package store and click on + new to create a linked service that will be pointing to our package store.
Name your linked service, Select the type, account selection method will be enter manually, provide the fully qualified domain name, select the database, select authentication type, provide the username and password, then click on create.
Once our linked service is created click on Add.
Our package store is added, click on continue.
Select the maximum parallel execution per node, Checkmark the VNet, select the VNet name, Select the Subnet name, click on continue, then click on Create.
Video Demo: How to Create Azure SSIS IR with MSDB Package Store(Store SSIS Packages in MSDB on Managed Instance)
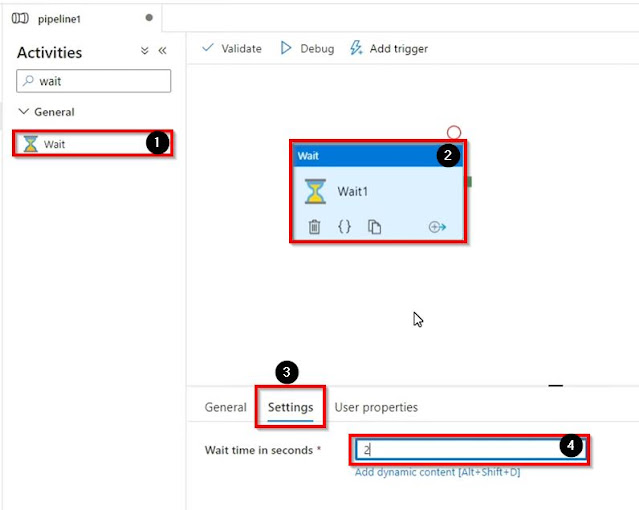
Issue: What Is Wait Activity in Azure Data Factory.
In this article, we are going to learn about the Wait activity, When you use a Wait activity in a pipeline, the pipeline waits for a specified period before continuing with the execution of subsequent activities, let's start our demonstration.
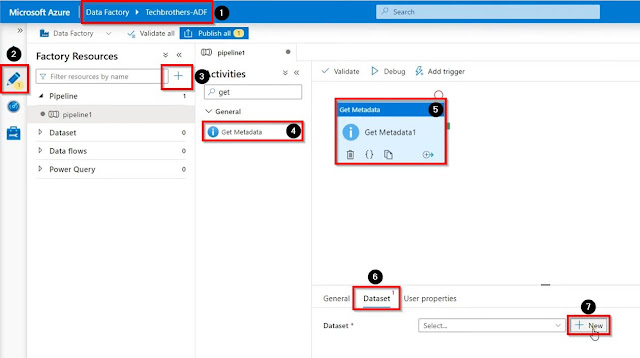
Open your Azure data factory studio, go to the author tab, click on + sign and create a new pipeline, find and bring the Get metadata activity, go to the dataset tab, and click on the + New button to create a new one dataset.
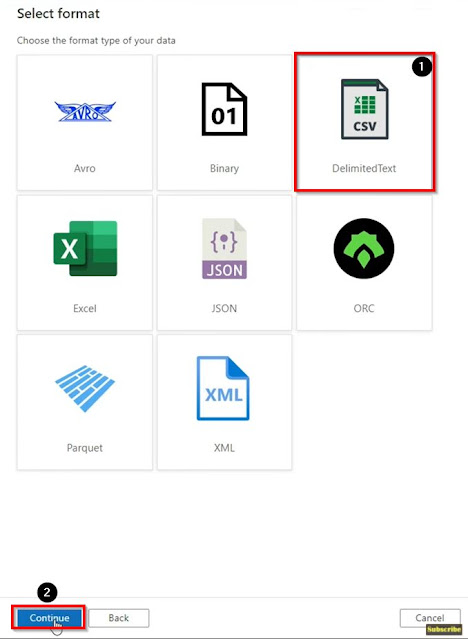
Select Azure blob storage then click on continue.
Select file format as CSV, then click on continue.
Name your dataset, select the linked service, select the folder path, Import schema from connection/store, and click on Ok.
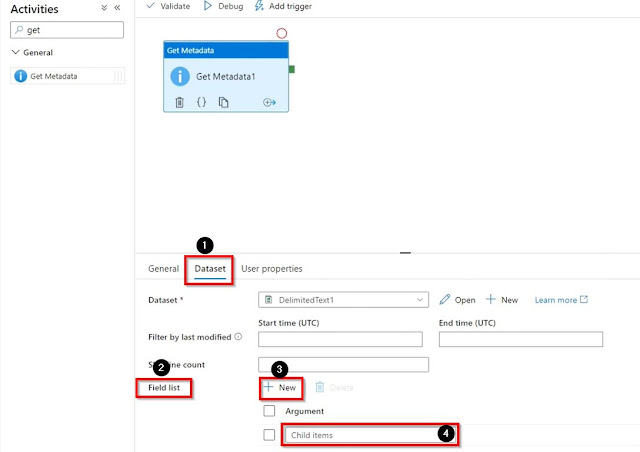
In the dataset tab, click on filed list, click on the + New button, then select the Child items it will bring the list of the files from my blob storage, then I can choose the files from that list.
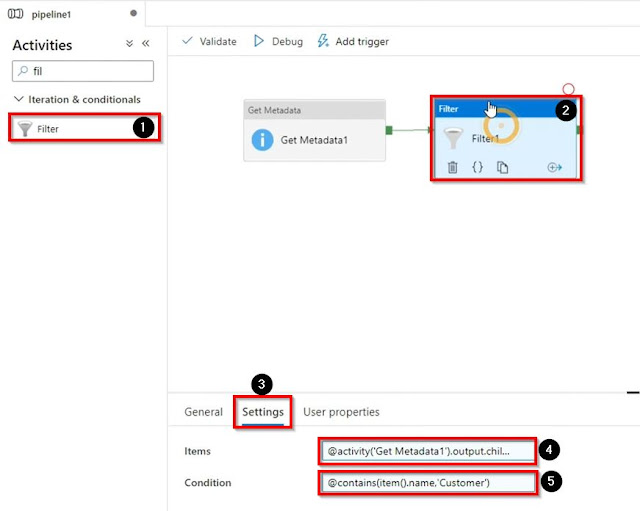
Find and bring the Filter activity, go to the settings tab, then in the items field click on Add dynamic content, then select the Get metadata activity, and add .childitems in the end, in the condition field write the expressions and in the end mention the required files.
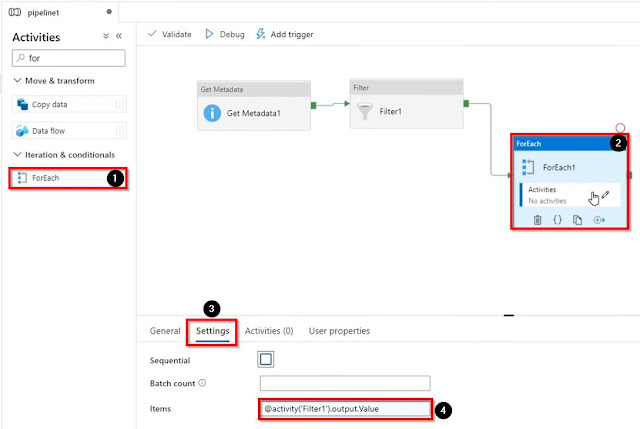
Next, find and bring the ForEach loop activity, go to the settings tab, in the items click on add dynamic content, select the Filter activity, in the end, add .Value
Inside the ForEach loop activity find and bring the wait activity, then in the settings tab, you can select the time as per your requirement, after that you can add a copy data activity or other activity then go back to the pipeline and execute the pipeline.
Video Demo: What is Wait Activity In Azure Data Factory